Python Based Development at GQC
This document shall serve as the master-reference for all Python based development at GQC.
Install Python
- When installing Python, be sure to download from the official website. https://www.python.org/downloads/windows/
- Make sure you select the 64-bit version when downloading the installer.
- If you have admin permissions on the computer, choose "Install for
all users". If you don't have admin permissions, then this installation will be stored under your user profile. In most cases, you should choose "Install for all users".
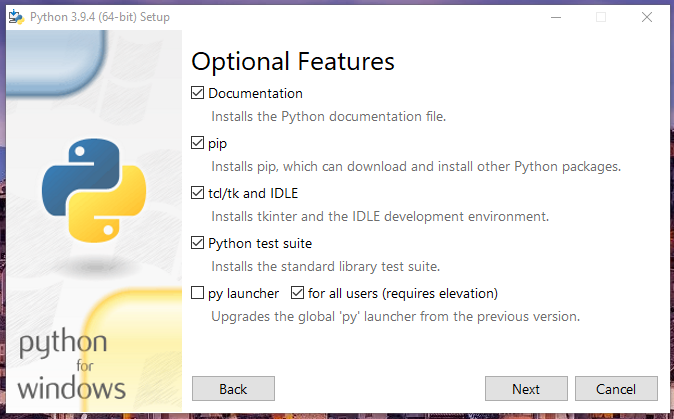
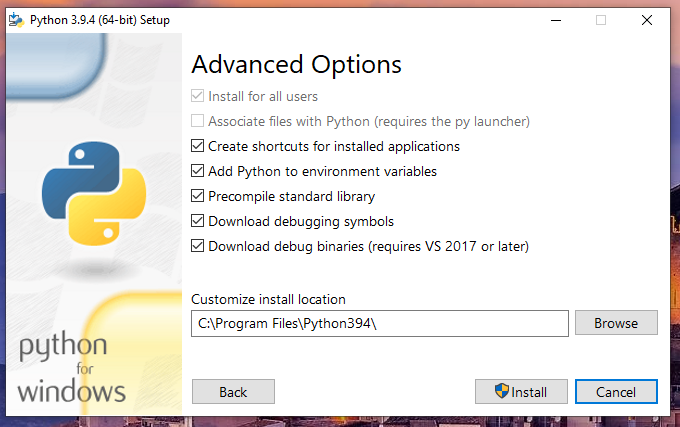
- When prompted for an installation directory, the default for "all users" will be
C:\Python3\.- If this is your first/only instance of Python 3, then that is fine.
- If you are installing your second instance of Python 3, for example the next minor release, you should change the directory to include the minor version, for example if 3.9:
C:\Python39
- Only select "Add Python to environment variables" if you would like this installation to be your default version.
Virtual Environments
- Python Virtual Environments are critical pieces of infrastructure that allow you to separate projects' dependencies into unique environments.
- The primary tool for creating virtual environments is the pypi package venv, while GQC uses virtualenvwrapper and virtualenvwrapper-win to easily manage virtual environments.
This is usually the case when developing in docker or on linux when permission issues might prevent the service user (such as nginx or www-data) from being able to access the user-scoped virtualenvwrapper instance.
Windows Install virtualenvwrapper-win
Install virtual environment package:
pip install virtualenvwrapper-winCreate a virtual environment using the base python installation:
mkvirtualenv env_nameCreate a virtual environment using a different python installation:
mkvirtualenv env_name -p C:\Program Files\python39\Scripts\python.exeList all existing virtual environments:
workonActivate a virtual environment:
workon env_nameDeactivate a virtual environment:
deactivateDelete a virtual environment:
rmvirtualenv env_name
Linux Install virtualenvwrapper
https://virtualenvwrapper.readthedocs.io/en/latest/install.html
Install virtual environment package:
pip install virtualenvwrapperModify your shell startup profile to make the wrapper commands available on login:
nano ~/.bashrcAdd the following lines to the end of the file:
export WORKON_HOME=$HOME/.virtualenvs
export PROJECT_HOME=$HOME/Devel
source /usr/local/bin/virtualenvwrapper.sh
After editing, run:
source ~/.bashrc
Linux install mambaforge
On WSL and Ubuntu based systems, GQC uses mambaforge to manage python environments. To view the documentation for setting up Python in WSL, see the link → here
Mambaforge allows you to create a new virtualenv with a different python version compared to its initial install. This is required feature as many AI algorithms have dependencies on certain python versions. :::
Some reference links which explain this in a lot more detail,
- https://aseifert.com/p/python-environments/
- https://ross-dobson.github.io/posts/2021/01/setting-up-python-virtual-environments-with-mambaforge/
Commands that are of use are:
- conda create -n venv_name : Creates new virtual environemnt, given that conda is installed
- python3 -m venv .venv : This is to specify python version while creating env on linux
Troubleshooting Virtual Environment Issues
For troubleshooting steps, see the document "Python Virtual Environments.docx".
OPTIONAL Custom Folder Template
https://marketplace.visualstudio.com/items?itemName=Huuums.vscode-fast-folder-structure
Requirements Files
For example, NumPy has separate requirements files for different environments: https://github.com/numpy/numpy
- doc.requirements.txt -- required for building documentation
- linter_requirements.txt -- required to run linters
- release_requirements.txt -- required to use the project in release mode
- test_requirements.txt -- required to run tests
Directory Structure
Python Package Directory
- LICENSE
- Makefile
- README.md
- docs/
- setup.py
- src/ or project_name/
- requirements.txt
Django App Directory
- LICENSE
- README.md
- database/
- docs/
- manage.py
- app1/
- app.../
- appN/
Documentation
Documentation for Python code is generated from "docstrings". Refer to Customize VS Code for more information on plugins to facilitate the writing of docstrings.
The linter "pydocstyle" can be used to check for errors in docstrings.
After documenting a codebase with docstrings, one of two paths can be taken to generate documentation:
Django built-in admindocs
The first and simplest method for generating documentation is specific to Django. A very few changes are required to add Django's built-in admindocs functionality:
- Add the app requirement "django.contrib.admindocs" to your
settings.pyfile: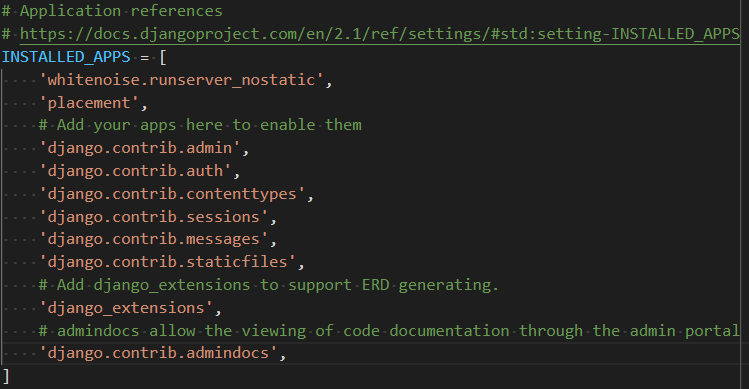
- Add a path for the admindocs to your urls.py file: (from django.conf.urls import include)

- Install (and add to
requirements.txt) the docutils pip package:pip install docutils - (Optional) Add a navbar link to the documentation page:

- Run the app and navigate to
/admin/doc/, or click on the link if you created one.
Sphinx
The second and more generic documentation generator (it works with all Python code, not just Django applications) is Sphinx: https://www.sphinx-doc.org/en/master/
Email by Melissa about Sphinx: I also looked on Dropbox and this was also the answer there as well. We use the pydocstyle for commenting so that must be where I am getting pydocs.
Documentation:
Documentation for Python code is generated from "docstrings". Refer to Customize VS Code for more information on plugins to facilitate the writing of docstrings.
The linter "pydocstyle" can be used to check for errors in docstrings.
After documenting a codebase with docstrings, one of two paths can be taken to generate documentation:
Django built-in admindocs (Specifically for Django)
Sphinx
You will want to use Sphinx.
Please follow the instructions on the website for generating Sphinx documentation.
I would follow the Generate md files with Sphinx instructions rather than the html ones.
This walkthrough will cover the use of sphinx for general python and django specific applications.
Install the Sphinx pip package and read-the-docs theme:
pip install sphinx sphinx-rtd-themeCreate a docs directory in the root of the Django project directory:
mkdir docsCD into the new docs directory.
Run the sphinx quickstart command:
sphinx-quickstartFor the quickstart, all defaults can be accepted with the exception of:
- App name
- Author
- Version
Open this directory with VS Code to configure Sphinx. You can run the command
code .in the command shell to automatically open the current directory in VS Code.Open conf.py and configure it for Django by adding the following code:
 import os
 import sys
 import django

 sys.path.insert(0, os.path.abspath('../'))
 sys.path.insert(0, os.path.abspath('../../'))
 sys.path.insert(0, os.path.abspath('.'))
 os.environ.setdefault("DJANGO_SETTINGS_MODULE", "chama_django.settings")
 django.setup()
In conf.py, find the extensions section and add the following two extensions:
extensions = [
    'sphinx.ext.napoleon',
    'sphinx.ext.autodoc'
]- In conf.py, find the html_theme section and define it as
sphinx_rtd_theme
html_theme = 'sphinx_rtd_theme'Back in the command prompt, CD up into the root project directory.
Generate the project's rst files:
sphinx-apidoc -f -o docs/source .CD into the docs directory.
Open VS Code again to exclude migrations from the documentation:
- For each Django application in your project, remove the migrations from the relevant RST file. For example, the project placement includes placement.migrations, so remove the line:
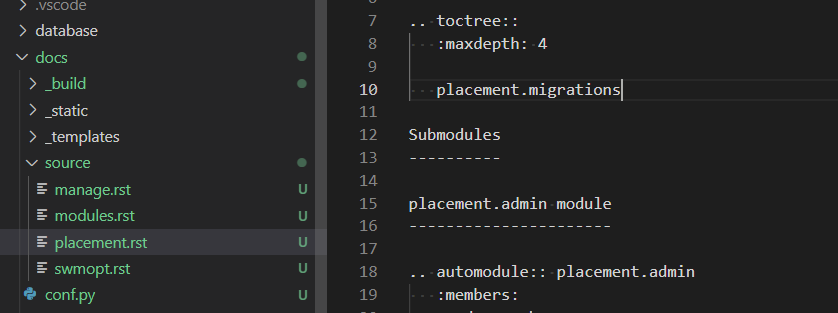
- Delete any *migrations.rst files under the docs/source directory.
- For each Django application in your project, remove the migrations from the relevant RST file. For example, the project placement includes placement.migrations, so remove the line:
Generate the HTML documentation:
make htmlNavigate to
docs/_build/html/and open theindex.htmlfile to view your documentation.
Note: In order to view the documentation generated using Sphinx, at the moment, there are 2 ways to render the pages.
gh-pagesbranch deployed on the github repository for which documentation is done. Checkout the branch to view the docs generated. If setup is done, github bot will render the docs as static web pages too.- In local, run
make htmland open theindex.htmlfile in thedocs/_build/html/directory.
Generate md files with Sphinx
Sphinx can be used to generate Markdown documentation files instead of HTML files with the extension install sphinx-markdown-builder
- Follow the standard Sphinx documentation steps as outlined above, stopping after step 8.
- Open the conf.py file and add
sphinx_markdown_builderto the extensions list. - From the docs directory, run the command
sphinx-build -M markdown source build
Display md files in Sphinx
Sphinx uses rst files for documenting modules and submodules. rst files are not so user-friendly and have a steeper learning curve compared to md files. This section contains simple steps which allow you to add md files in your Sphinx documentation.
Install extension myst-parser,
pip install myst-parserAdd the extension inside
conf.pyin theextensionslistextensions = ['sphinx.ext.napoleon', 'sphinx.ext.autodoc', 'myst_parser']Voila! You have now enabled
mdfiles in your Sphinx documentation.Create new
mdfiles insidedocs/sourceas you want. Add images, hyperlinks, code snippets, etc.Finally, make sure you include those files in the
tocinsideindex.rst
Documenting submodules
If you have multiple submodules inside your python package resulting in a folder structure given below ↓
Make sure all submodules have __init__.py in them.
foo-package # Root directory of your site
└── submodule 1
   └── __init__.py
   └── foo1.py
   └── foo2.py

└── submodule 2
   └── __init__.py
   └── foo1.py
   └── foo2.py

└── nested-submodule
   └── __init__.py
   └── nested-submodule-2
      └── __init__.py
      └── foo.py

utils.py
...
...
...
mkdocs-material
This is one of the most lightweight documentation frameworks. To get started, install mkdocs-material
pip install mkdocs-material
Assume the folder structure of a following python project
├── foo-package
│   └── __init__.py
└── setup.py
Once installed, go to the root directory of your python project and run mkdocs new .. This will create 1 new folder and 1 new yml file, in the following fashion.
├── docs
│   └── index.md
├── foo-package
│   └── __init__.py
├── mkdocs.yml
└── setup.py
You can then create new markdown files in the docs folder, add them in the mkdocs.yml file and run the command
mkdocs serve
to view the rendered documentation.
mkdocstrings extension
This extension allows scraping docstrings from python functions. To set this up, install the mkdocstrings package, pip install mkdocstrings, then follow the steps in the following screenshot:
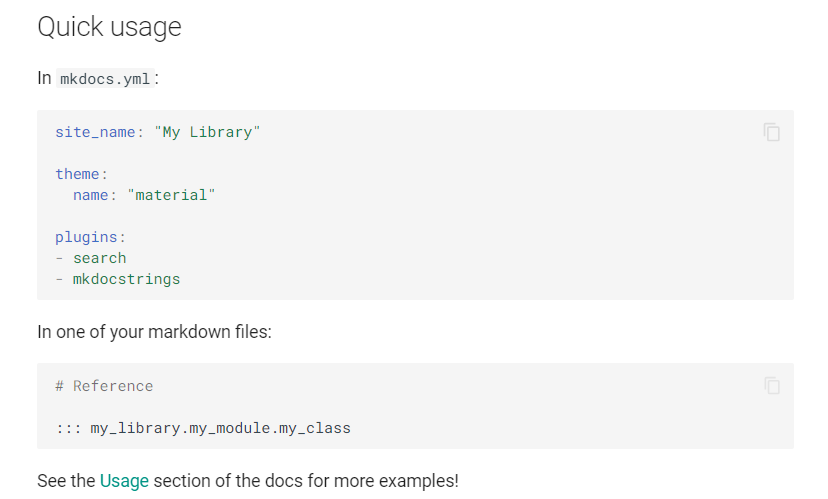
For more examples, view the documentation
Integrated Development Environments (IDE's)
VS Code
Install VS Code
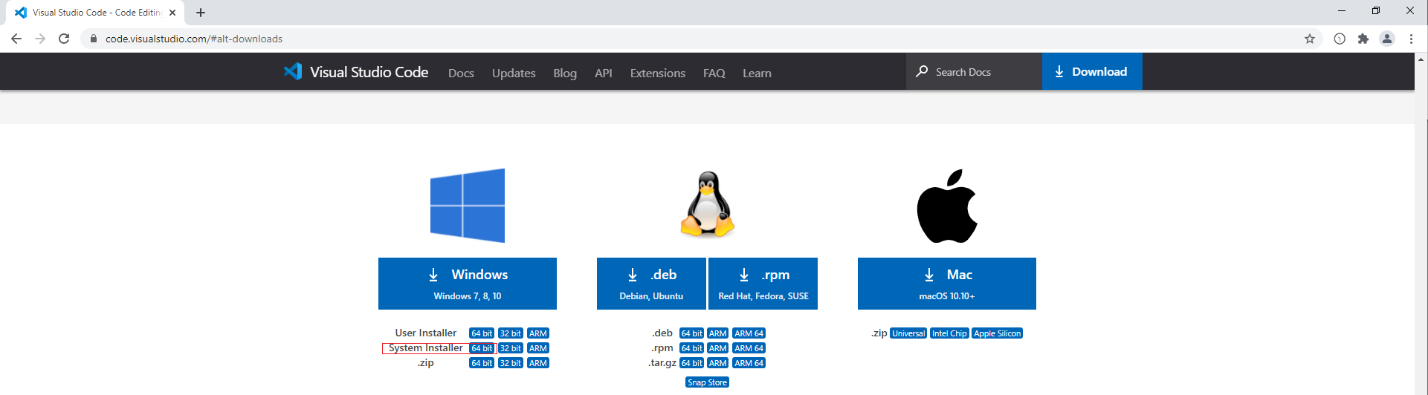
- Download the latest 64 bit Stable Build System Installer from Visual Studio Code's home page.
- https://code.visualstudio.com/#alt-downloads
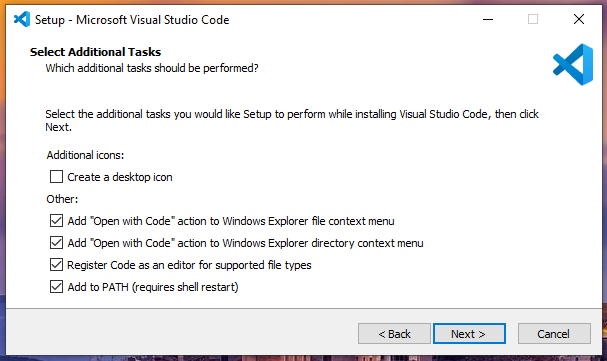
- When prompted to "Select Additional Tasks", ensure you check the following boxes:
- Add "Open with Code" action to Windows Explorer file context menu
- Add "Open with Code" action to Windows Explorer directory context menu
- Register Code as an editor for supported file types
- Add to PATH (requires shell restart)
1) All other defaults can be accepted when installing.
VS Code Debugging Configurations
VS Code allows quite a bit of customization in how the debugger runs. Some of the primary configurations might include:
- Script file debugging.
- This is the default behavior of the VS Code debugger. If you open a py file and press F5, it will try to debug the current file.
- Script runner debugging.
- Some of GQC's projects have utilized a common "script runner", which is essentially shared code used to call a variety of more specialized scripts.
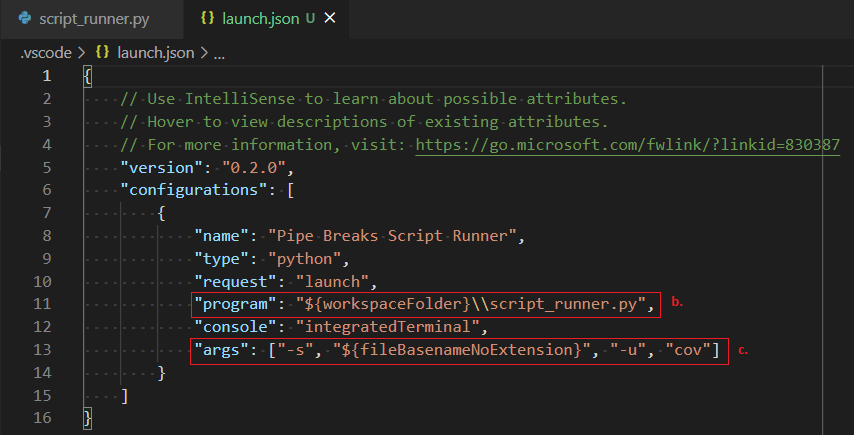
- To set this up, you need to define a few settings in the debug configuration:
- In the top dropdown bar, select Run > Open Configurations or Add Configuration if Open isn't available.
- If choosing Add Configuration, the command palette will expand, requiring you to select what kind of debugging is needed. Select Python File.
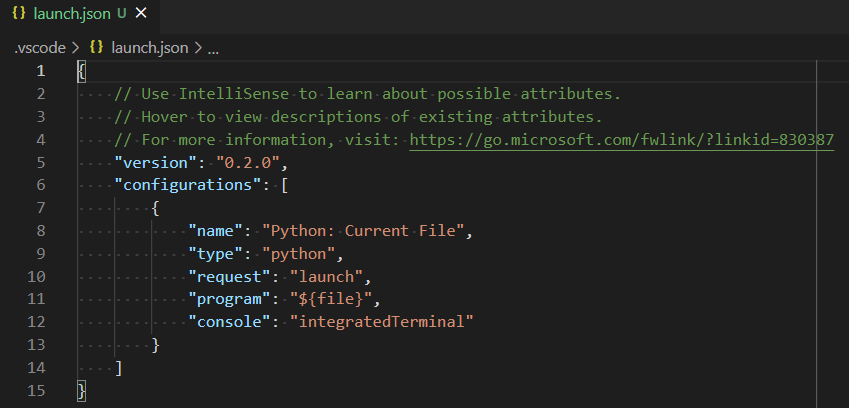
- Modify the "program" field to tell the debugger what file is going to be run. In our case, it will be the common script_runner.py file.
- If your script requires command-line parameters, add an "args": [] section to the configuration, as seen in the following snip.
- Django debugging or other python frameworks.
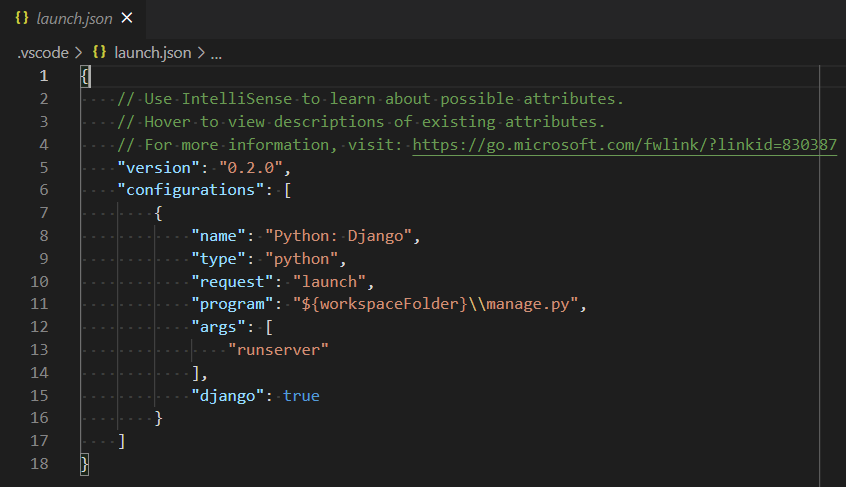
- In the top dropdown bar, select Run > Open Configurations or Add Configuration if Open isn't available. If choosing Add Configuration, the command palette will expand, requiring you to select what kind of debugging is needed. Select the project type such as Django.
- You shouldn't need to write any custom configurations, but if you do, ensure your launch.json file matches the following:
Customize VS Code
VS Code allows for a large variety of customizations. This section will outline some of the useful Python-related extensions:
- Jupyter (Microsoft) -- Jupyter notebook support.
- markdownlint (David Anson) -- Markdown linting and style checking. Not strictly necessary for Python development, but useful for Markdown documentation.
- Python (Microsoft) -- Linting, Debugging (multi-threaded, remote), Intellisense, Jupyter Notebooks, code formatting, refactoring, unit tests, and more.
- Python Docstring Generator (Nils Werner) -- Automatically generates detailed docstrings for python functions.
- Python Indent (Kevin Rose) -- Correct python indentation.
- Code Spell Checker (Street Side Software) -- Spell checker for VS Code. This was suggested as a replacement for Microsoft's deprecated plugin: https://github.com/microsoft/vscode-spell-check
VS Code Commands and Configurations
- Press Ctrl+Shift+P to open the Command Palette.
- In the command palette, type Python: to see all supported commands under the Python Extension. Following are some important Python commands:
- Python: Select Linter -- Switch between different linting tools,
such as
pycodestyleandpydocstyle. - Python Run All Tests -- Run python unit tests.
- General VS Code settings and configurations can also be accessed via the Command Palette:
- Preferences: Open Settings (UI or JSON)
- Preferences: Color Theme
- View: Toggle render whitespace
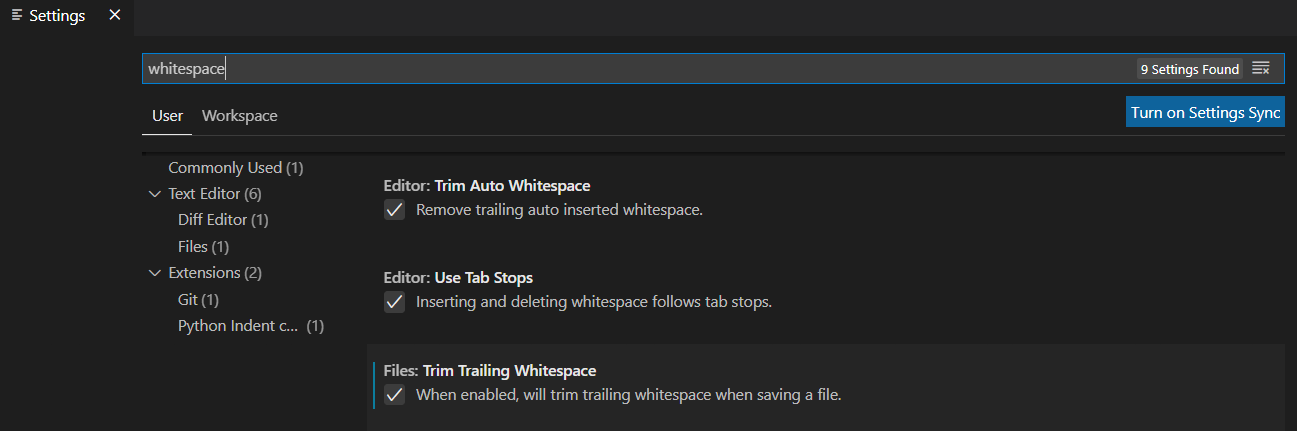
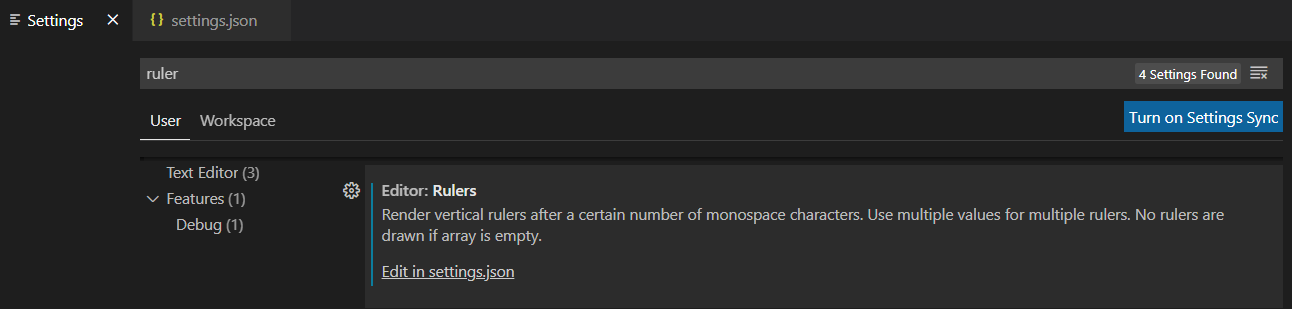
- VS Code UI Settings -- Some common settings to look at:
- Trim trailing whitespace:
- Rulers, display a vertical ruler at certain column counts:
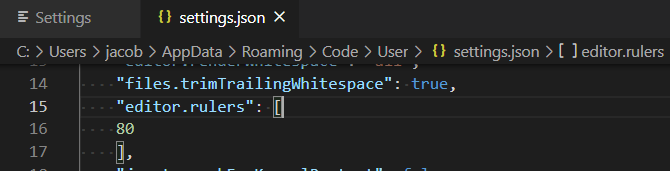
- Trim trailing whitespace:
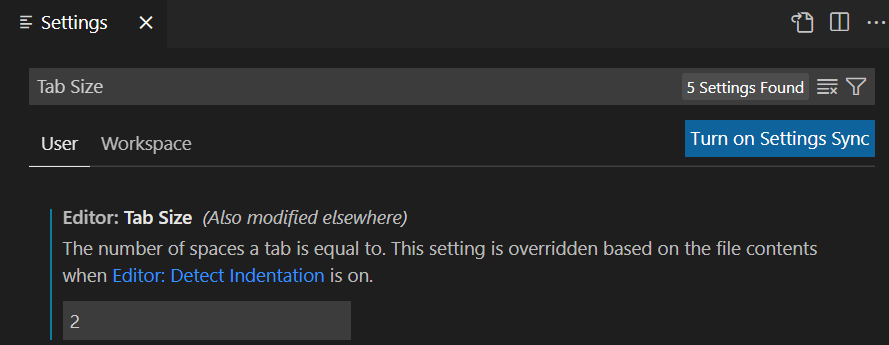
- VS Code Indentation
- The standard tab size for GQC's code development is 2 spaces:
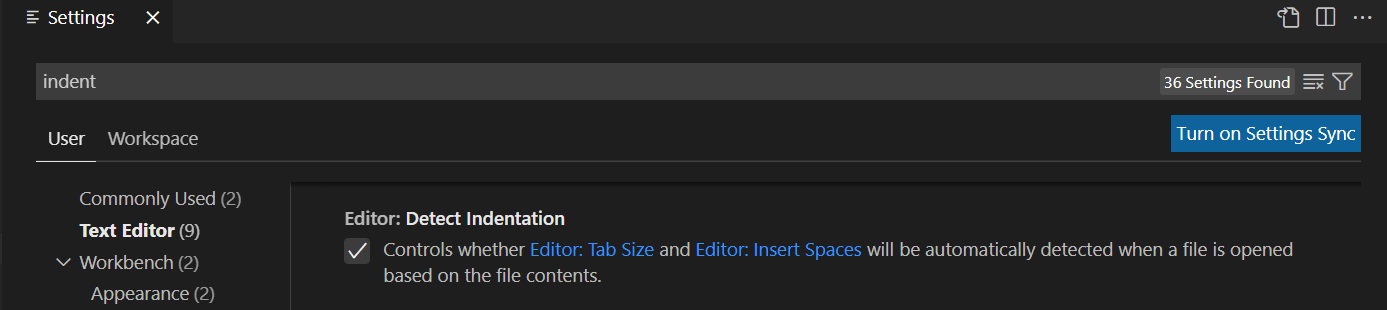
- You might need to disable "Detect Indentation" if existing code
switches your indentation preferences from 2 to 4 spaces, or
some other setting:
- The standard tab size for GQC's code development is 2 spaces:
Format Python in VS Code
Python code can be automatically formatted with the pip package yapf. The steps herein can be used to support any python formatting tool but yapf has more options for configuring formatting rules.
- Install the formatting package, yapf: [ pip install yapf ]
- Ensure the Python extension is installed for your instance of VS Code.
- Use Ctrl + Shift + P to open the command palette, then search for Settings (UI).
- Search for the setting "python formatting provider" and dropdown to
select the formatter, yapf:
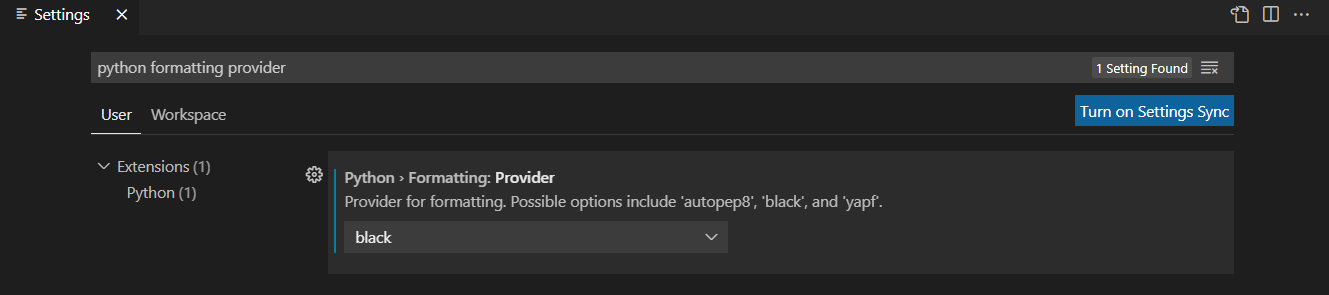
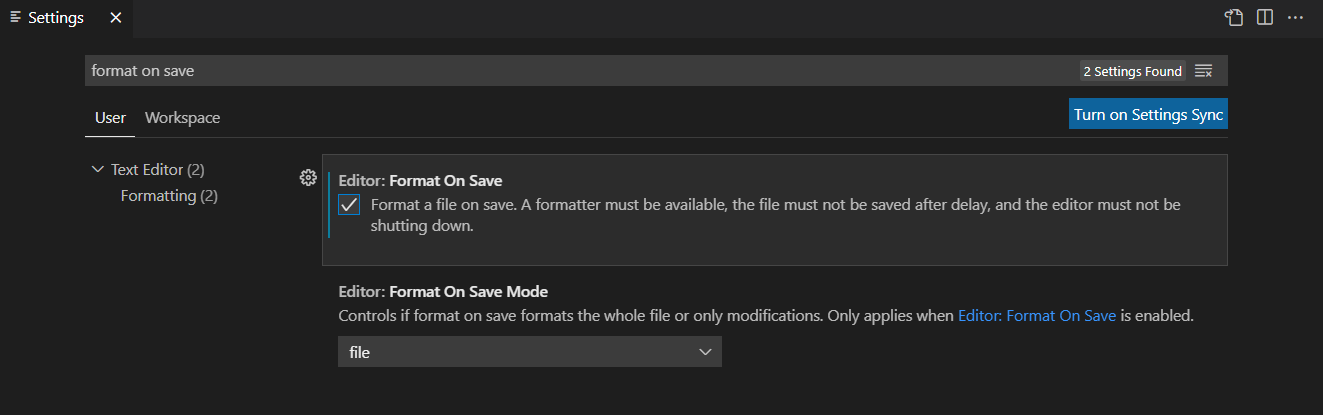
- Search for the setting "format on save" and check the box:\
- Change yapf's configured indentation size:
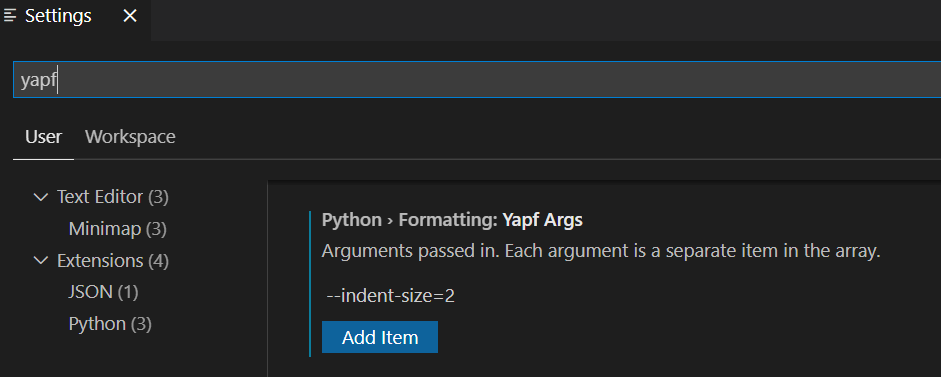
- yapf will now format python files when they are saved.
isort for sorting imports
- Install
isortusingpip install isort - To apply isort recursively, use
isort .
flake8 for linting
- GQC uses
flake8for linting flake8expects a.flake8in the root of the repository to get its configuration.- The contents of the standard file are like
tomlfile.
The .flake8 file should have the following content
[flake8]
indent-size = 2
Linting (formatting) long strings in Python
flake8andyapfhave a character length limit of 80 characters- Hence, if a line exceeds that length, it needs to be reformatted into 2 lines.
- There are multiple ways to format long strings.
- This is taken from the StackOverFlow post over → here
long_str = ("This is the first line of my text, "
"which will be joined to a second.")

# OR

long_str = ("This is the first line of my text, " +
"which will be joined to a second.")
Be careful, string concatenation with \ is very delicate. It can lead to malformed strings.
- This is only a temporary hack to skip Flake8 long line issue, which helps during active development but is not recommended in the production code.
- Use can use
# noqa: E501at the end of the line to skip the linter check for that line.
- Use can use
- If you are formatting which contains a long SQL query that can break because of this.
- For best practice, print the generated query string and put the execution of the SQL query in a try/catch block
Python Interpreters in VS Code
- Specify a project's or workspace's Python environment in the
bottom-left corner of VS Code:\

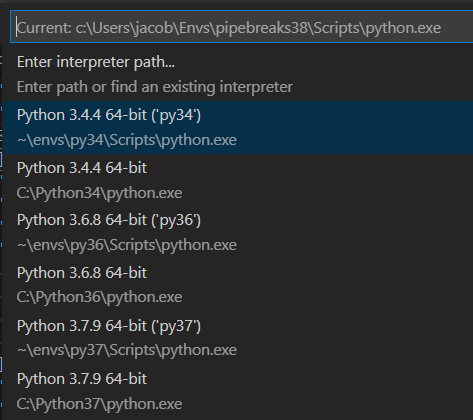
- After clicking the current environment, a list of available
environments will dropdown from the command palette:
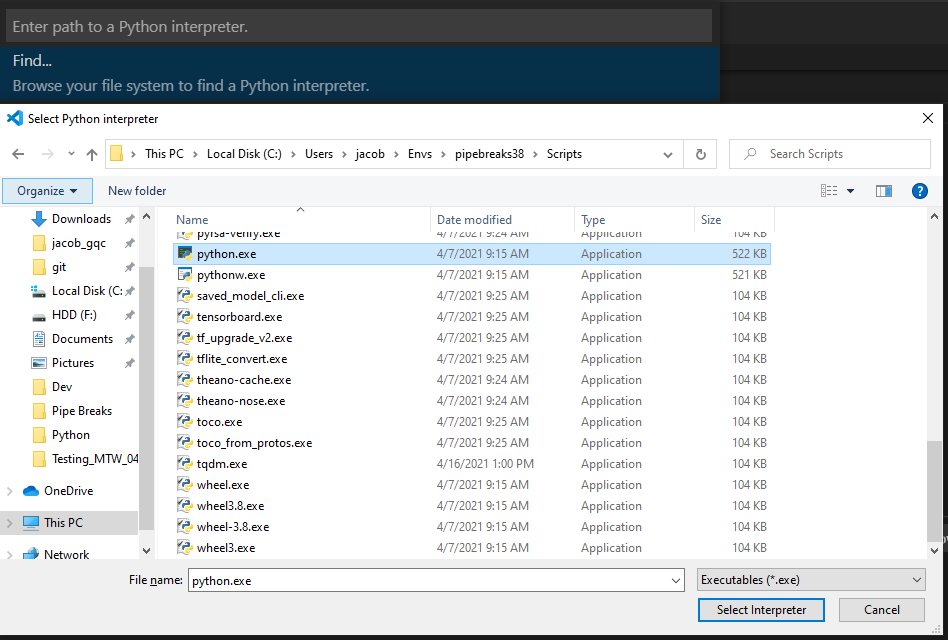
- Choose "Enter interpreter path..." then "Find..." to navigate to
an interpreter that isn't listed and navigate down into the
directory containing the python.exe file:
- After clicking the current environment, a list of available
environments will dropdown from the command palette:
- Jupyter Notebook environments are different from the normal py file
environment. To specify a Jupyter Notebook's python environment, you
must first open the notebook. After opening the notebook, you can
select the interpreter in the top-right corner of VS Code:

PyCharm
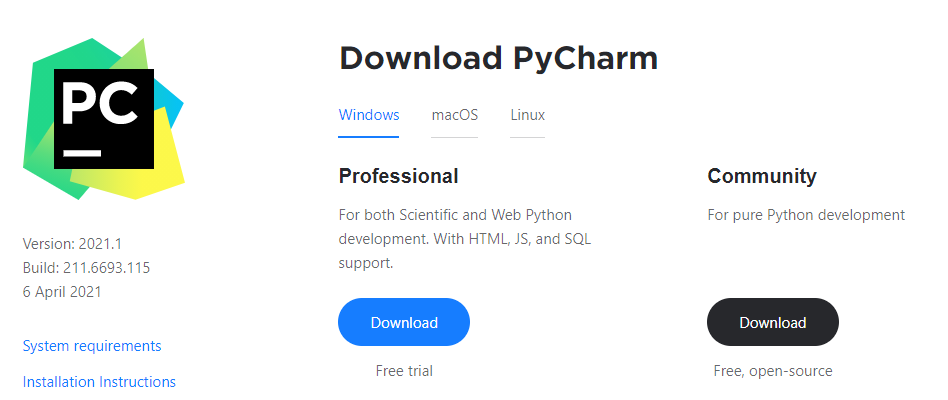
- Download the Community (Free and open-source) edition of PyCharm: https://www.jetbrains.com/pycharm/download/#section=windows
- When installing, accept the default location.
- Create a Desktop Shortcut if you would like.
- Ensure you check 'Add "Open Folder as Project"'
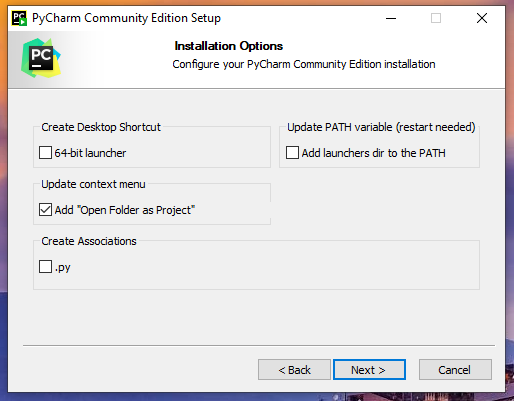
- Accept defaults for the rest of the installation.
PyCharm Debugging Configurations
Django
Generate DB Entity Relationship Diagram
Most of GQC's codebases should include a batch or shell script for generating an ERD with Django. If this is the case, then all you need to do is workon the appropriate venv, install PyGraphViz (see the following section), and run the generate script. If there isn't already a generate script, you can copy this code:
\@echo off
For /f "tokens=2-4 delims=/ " %%a in ('date /t') do (set mydate=%%c-%%a-%%b)
For /f "tokens=1-2 delims=/:" %%a in ("%TIME%") do (set mytime=%%a%%b)
echo Writing models for %mydate% %mytime%

set DateStr=%mydate%_%mytime%

\@REM Specify which models to exclude from the ERD, i.e. Django default models.
set
Exclude=User,Session,AbstractUser,ContentType,Permission,LogEntry,AbstractBaseSession,Group

\@REM pip install graphviz pydotplus

python manage.py graph_models -a -g -X %Exclude% -o database/models_%DateStr%.png
python manage.py graph_models -a -g -X %Exclude% >database/models_%DateStr%.dot
Install PyGraphViz
These instructions were adopted from the official PyGraphViz documentation: https://pygraphviz.github.io/documentation/stable/install.html
Download and install 2.46.0 for Windows 10 (64-bit): https://gitlab.com/graphviz/graphviz/-/package_files/6164164/download
Ensure you're in the right venv with the workon command.
Install the pip packages with:
python -m pip install --global-option=build_ext --global-option="-IC:\Program Files\Graphviz\include" --global-option="-LC:\Program Files\Graphviz\lib\" pygraphviz**
Jupyter notebooks and Google Colab
How to export a python notebook to a script?
In
Google Colab, we can download the notebook as a.pyscript from the context menu.A local python notebook can be exported as a python script by
jupyter nbconvert --to script <notebook_file>.ipynb
Inserting pandas Dataframe to SQL
To insert a pandas dataframe to a SQL database, use the to_sql method provided by pandas. Further documentation for this method can be found here.
When working with Pandas Dataframes and integrating with SQL, you need to be careful with the typing. By default, Pandas will guess the field types when you try to insert. This might work in most cases, but it has also been known to cause errors when the types are poorly matched.
We have a Jira ticket discussing this, but I'm not sure where to find more information on the specific instance...